The Metropolis(-Rosenbluth-Rosenbluth-Teller-Teller)-Hastings algorithm

Consider a collection of random variables described by a joint probability distribution. Often, in any field with probability or statistics, one faces the task of simulating these random variables, which typically depend on each other in some fashion.

A now standard way for simulating or sampling such random variables is to use the Metropolis-Hastings algorithm, undoubtedly the cornerstone of Markov chain Monte Carlo methods. This method creates a discrete-time Markov chain that has a stationary or invariant distribution being the aforementioned distribution.

The algorithm was born out of a 1953 paper by Nicholas Metropolis, Arianna W. Rosenbluth, Marshall Rosenbluth, Augusta H. Teller, and Edward Teller (two husband-wife pairs), who looked at a special case, and a 1970 paper by W.K. Hastings, who generalized the method. It is typically called the Metropolis-Hastings or the Metropolis algorithm. And some have called it the M(RT)2 H algorithm.

(The history is a bit complicated, but perhaps we should drop the name Metropolis. The late Arianna (née Wright) Rosenbluth did most of the work. She was also a dab hand at fencing.)

Although the algorithm’s initial adoption and use was slow, taking decades partly due to slower computers, the Metropolis-Hastings algorithm is now a widely used method for simulating collections of random variables. This in turn gives fast ways for exploring, integrating, and optimizing otherwise unwieldy mathematical functions, such as those found in Bayesian statistics, machine learning, statistical physics, and combinatorial optimization. The algorithm serves as the foundation for other random simulation methods, such as the Gibbs sampler, hence it’s been called the workhorse of Marko chain Monte Carlo methods.

There are many books, articles, lecture notes, and websites describing the Metropolis-Hastings algorithm; see the Further reading section below. But I’ll detail the core ideas here. This post is designed to be somewhat self-contained, but it arose from a series of posts, starting with this one and ending with this particularly relevant one.

Constructing a Markov process

Take a collection of \(n\) random variables \(X_1,\dots,X_n\) with a (joint) probability distribution \(\pi(x)=\pi(x_1,\dots,x_n)\). This distribution will either be a (joint) probability mass function or (joint) probability density for discrete or continuous random variables, respectively.

We wish to construct a Markov chain on an abstract mathematical space \(\mathbb{X}\). We assume we can write a point \(x\in \mathbb{X}\) as \(x=(x_1,\dots,x_n)\). More specifically, the space \(\mathbb{X}\) is a Cartesian product of spaces \(\mathbb{X}_1,\dots,\mathbb{X}_n\) on which the variables are defined.

Which mathematical space is \(\mathbb{X}\)? That will, of course, depend on the random variables you’re trying to simulate. But it’s usually the lattice \(\mathbb{Z}^n\), Euclidean space \(\mathbb{R}^n\), or a subset of one of these two spaces.

For this post, we’ll assume that the space \(\mathbb{X}\) is discrete, which makes the things simpler. But the mathematics is similar for continuous spaces, with small changes such as replacing probabilities and sums with probability densities and integrals, respectively. We’ll further assume the space is finite, so we can use matrices to describe the Markov transition kernels. But everything covered here will work on infinite spaces such as \(\mathbb{R}^n\), which is the most common space used in practice.

Again, our overall aim is to construct a Markov chain with a stationary \(\pi\) being the same as the distribution that we want to sample.

Jumper process

There’s a random jumper that wants to jump around the space \(\mathbb{X}\). The jumper randomly jumps from one point in this mathematical space \(x\in \mathbb{X}\) to another point \(y\in \mathbb{X}\) according to the probability \(J(x,y)\). If the the state space \(\mathbb{X}\) is finite, then \(J\) becomes a matrix. The matrix row \(J(x,\cdot)\) is a probability mass function for each \(x\in \mathbb{X}\), so it sums to one. By definition, this random jumping forms a Markov chain.

The only thing we ask is that, for our jumper, every point \(x\) in \(\mathbb{X}\) where \(\pi(x)>0\) is reachable with positive probability in a single step. This implies the easy-to-achieve condition \(J(x,y)>0\) where \(\pi(x)>0\) for all points \(x,y\in\mathbb{X}\).

Now we have a Markovian jumper on the space \(\mathbb{X}\). But this turns out to be too much jumping for our jumper. Furthermore, the jumper is jumping more in certain directions than others. Occasionally the jumper wants to stay put (and have a rest) with the aim of balancing the jump directions.

The jumper still wants to jump sometimes from a point \(x\in \mathbb{X}\) to another point \(y\in \mathbb{X}\) based on \(J(x,y)\). But now at each time step, after choosing the jump direction but before jumping, the jumper flips a biased coin whose success probability \(\alpha(x,y)\) depends on the current position \(x\in \mathbb{X}\) and the (potential) next position \(y\in \mathbb{X}\). For the coin, the acceptance probability, which allows (or not) the jumper to move from \(x\) to \(y\), is given by

$$\alpha(x,y)=\min[1,\frac{\pi(y)}{\pi(x)}\frac{J(y,x)}{J(x,y)} ]\,,\quad x, y\in \mathbb{X}\,.$$

The function \(\alpha(x,y)\) is clearly never negative. The minimum in the above expression ensures that \(\alpha(x,y)\) is a valid probability.

Metropolis-Hastings ratio

The ratio in the expression for \(\alpha(x,y)\) is sometimes called the Metropolis-Hastings ratio, which we’ll soon see is designed specifically to balance the jump directions. The ratio means that a constant factor in the target distribution \(\pi(x)\) will vanish due to cancellation.

More specifically, if we can write the target distribution as \(\pi(x)=f(x)/C\), where \(C>0\) is some constant and \(f(x)\) is a non-negative function, then the ratio term \(\pi(y)/\pi(x)=f(y)/f(x)\). This reasoning also applies to a constant factor in the transition kernel \(M\).

The constant factor being irrelevant in the target distribution \(\pi(x)\) is very useful. It is particularly important for posterior distributions in Bayesian statistics and the Gibbs distributions in statistical physics, as these distributions typically have difficult-to-calculate constants.

Metropolis-Hastings process

The pairing of the original jumper Markov chain with the coin flipping creates a new Markov chain, which we call the Metropolis-Hastings process. What’s remarkable is its stationary distribution will be the target distribution \(\pi(x)\).

Transition kernel (matrix)

For the Metropolis-Hastings process, we can readily reason the structure of the transition kernel (matrix) \(M\) that describes this Markov chain. First we’ll look at the off-diagonal entries of \(M\).

Jumping from \(x\) to \(y\neq x\)

To jump from point \(x\) and to another point \(y\neq x\), the probability is simply the previous probability \(J(x,y)\) multiplied by the probability of that proposed jump being accepted, which is \(\alpha(x,y)\), giving

$$ M(x,y) = \alpha(x,y) J(x,y), \quad x\neq y\,.$$

Now we examine the diagonal entries of \(M\).

Jumping from \(x\) to \(x\)

There are two different ways for the jumper to remain at point \(x\). The first way is that the jumper simply jumps from \(x\) to \(x\), which happens with probability \(J(x,x)\). This proposed jump, so to speak, is accepted with probability one because \(\alpha(x,x)=1\). Consequently, we can write this probability as \(\alpha(x,x)J(x,x)\) or \(J(x,x)\).

The second way consists of all the possible jumps from \(x\) to \(z\), but then for each of those proposed jumps to be rejected, which happens (for each jump) with probability \([1-\alpha(x,z)]\). (I am using here the dummy or bound variable \(z\) instead of \(y\) for clarity.) Adding up the probabilities of these events gives the probability of the second way being the sum \(\sum_{z\in \mathbb{X}}[1-\alpha(x,z)] J(x,z) \,.\)

Consequently, for a single time step, the probability that the jumper starts at point \(x\) and remains at \(x\) is

$$ M(x,x) = \alpha(x,x)J(x,x)+\sum_{z\in \mathbb{X}}[1-\alpha(x,z)] J(x,z) \,.$$

The transition matrix \(M\) should be stochastic, so the rows sum to one, which we see is the case

$$ \sum_{y\in\mathbb{X}}M(x,y)=1\,.$$

Of course, we could have derived the diagonal entry \(M(x,x)\) immediately by starting with the above sum, but that approach lacks intuition into what’s happening.

Expression for the transition kernel \(M\)

$$M(x,y) = \begin{cases}
\alpha(x,y) J(x,y) & \text{if }
\begin{aligned}[t]
x&\neq y
\end{aligned}\\
\alpha(x,x)J(x,x)+\sum_{z\in \mathbb{X}}[1-\alpha(x,z)] J(x,z) & \text{if } x=y
\end{cases}$$

Often the above expression is written as a single line by placing an indicator function or similar in front of the sum for the diagonal entries. (In the continuous case, where the sum is replaced with an integral, a Dirac delta distribution is often used instead.)

Reversibility

A Markov process on \(\mathbb{X}\) with kernel (matrix) \(K\) is (time) reversible with respect to the distribution \(\mu\) if the following holds

$$ \mu(x)K(x,y) = \mu (y) K(y,x)\quad x,y\in\mathbb{X}\,.$$

This reversibility condition is also called the detailed balance equation. If this condition is met, then the Markov process will have a stationary distribution \(\mu\). By summing over \(x\), we can verify this because we obtain

$$ \sum_{x\in\mathbb{X}}\mu(x)K(x,y) =\mu(y)\sum_{x\in\mathbb{X}} K(y,x)=\mu(y)\,.$$

This is just the balance equation, often written as \(\mu=K\mu\), which says that the transition kernel \(K\) has a stationary distribution \(\mu \).

(Strictly speaking, we don’t necessarily need reversibility, as long as the Markov chain has a stationary distribution. Reversibility just makes the algebra easier.)

The Metropolis-Hastings process is reversible

We can show that the Metropolis-Hastings process with the transition kernel \(M\) satisfies the reversibility condition. The proof essentially just requires the swapping of rows and columns. Clearly then we only need to look at the off-diagonal entries, so we assume \(x\neq y\).

We further assume that \(\pi(y)J(y,x)\geq \pi(x) J(x,y)\). Then \(\alpha(x,y)=1\), so \(M(x,y)=J(x,y)\). Now we use this last fact in the last line of algebra that follow:

$$\begin{aligned}\pi(y) M(y,x)&=\pi(y)J(y,x) \alpha(y,x)\\ &= \pi(y)J(y,x) \frac{\pi(x)}{\pi(y)}\frac{J(x,y)}{J(y,x)}\\ &= \pi(x)J(x,y)\\&= \pi(x)M(x,y)\,,\end{aligned}$$

which shows that the reversibility condition holds with the last assumption.

But of course we can reverse that assumption, due to symmetry, so \(\pi(y)J(y,x)\leq \pi(x) J(x,y)\), then \(\alpha(x,y)=[\pi(y)J(y,x)]/[\pi(x) J(x,y)]\) and \(\alpha(y,x)=1\), implying this way also works. Then the reversibility condition holds for all cases.

We could have shown this more quickly by observing that

$$\begin{aligned}\pi(y) M(y,x)&=\pi(y)J(y,x)\alpha(y,x)\\ &= \pi(y)J(y,x) \min[1, \frac{\pi(x)}{\pi(y)}\frac{J(x,y)}{J(y,x)}]\\ &= \min[\pi(y)J(y,x) , \pi(x)J(x,y)]\,,\end{aligned}$$

which is symmetric in \(x\) and \(y\).

In summary, the Metropolis-Hastings process is reversible and has the stationary distribution \(\pi(x)\).

Continuous case

As mentioned earlier, the continuous case is similar to the discrete-case with a few modifications. For example, assuming now \(\mathbb{X}\) is continuous, then the stationary distribution is described by a probability density \(\pi(x)\). The jumper process will be described by transition kernel (function) \(j(x,y)\), where \(j(x,\cdot)\) is now a probability density for each \(x\in \mathbb{X}\).

It follows that the acceptance probability is

$$\alpha(x,y)=\min[1,\frac{\pi(y)}{\pi(x)}\frac{j(y,x)}{j(x,y)} ]\,,\quad x, y\in \mathbb{X}\,.$$

The transition kernel (function) is

$$m(x,y) = \begin{cases}
\alpha(x,y) j(x,y) & \text{if }
\begin{aligned}[t]
x&\neq y
\end{aligned}\\
\alpha(x,x) j(x,x)+\int_{\mathbb{X}}[1-\alpha(x,z)]j(x,z) dz & \text{if } x=y
\end{cases}$$

For more details, there are derivations online such as this one, as well as the sources cited in the Further reading section below.

Libraries

Of course, before writing your own code, I would check out any pre-written functions in your favourite language that already implement the Metropolis-Hastings algorithm.

For example, in MATLAB there’s the function mhsample. Again I would be using this before writing my own code, unless it’s for illustration or educational purposes.

In Python there’s the library pymcmcstat. For those with a machine learning bent, there’s also a TensorFlow function MetropolisHastings.

In R, which is a language designed for statistics, implementations of any Markov chain Monte Carlo methods will be couched in the language and notation of (Bayesian) statistics. For a specific library, I can’t say I know which is the best, but you can check out the MCMCPack library. For R libraries, be wary of using the ones that were published and are (or were?) maintained by a single contributor.

Code

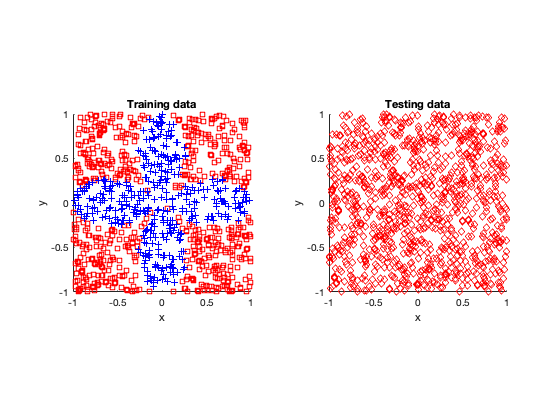
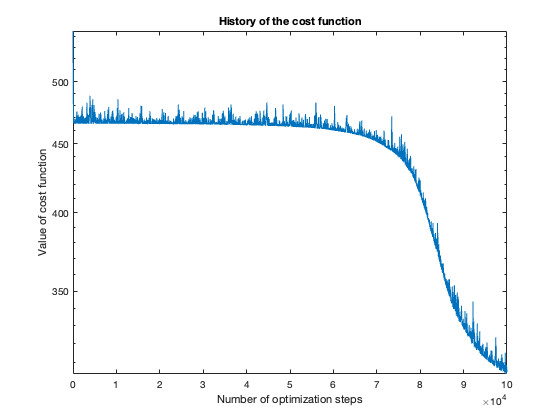
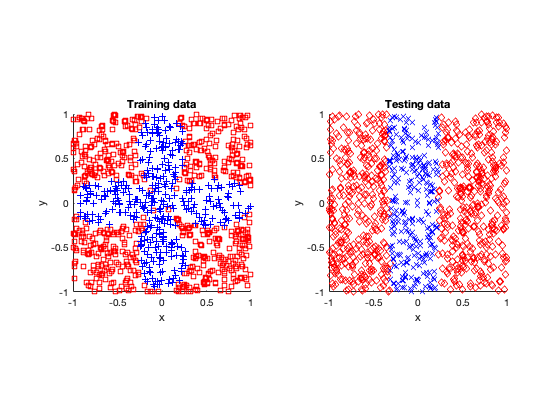
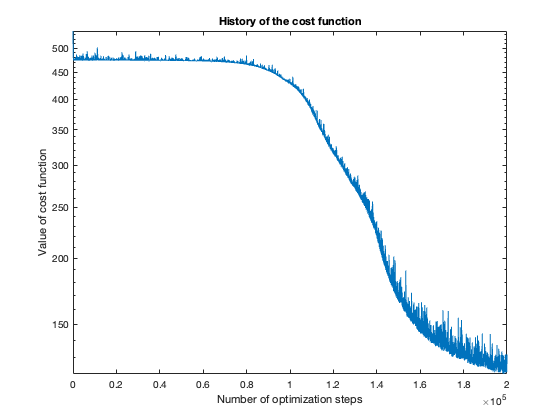
For a couple of simple examples in both one dimension and two dimensions, I’ve implemented the Metropolis-Hastings algorithm in the programming languages R, MATLAB, Python (NumPy) and Julia. The code can be found here.

Further reading

There are good articles on explaining the Metropolis-Hastings approach, as well as its history. On this topic, the articles are probably better resources than the books.

Articles

Historical

The two important papers behind the Metropolis-Hastings algorithm are:

  • 1953 – Metropolis, Rosenbluth, Rosenbluth, Teller, Teller – Equation of state calculations by fast computing machines;
  • 1970 – Hastings – Monte Carlo sampling methods using Markov chains and their applications.
Introductory

There are several tutorial and historical articles covering the Metropolis-Hastings algorithm. An earlier explanatory article is

  • 1995 – Chib and Greenberg – Understanding the Metropolis-Hastings Algorithm.

I also recommend:

  • 1994 – Tierney – Markov chains for exploring posterior distributions;
  • 1998 – Diaconis and Saloff-Coste – What do we know about the Metrolpolis algorithm?;
  • 2001 – Billera and Diaconis – A Geometric Interpretation of the Metropolis-Hastings Algorithm;
  • 2015 – Minh and Minh – Understanding the Hastings Algorithm;
  • 2016 – Robert – The Metropolis-Hastings algorithm.

The above article by Billera and Diaconis shows that the Metropolis-Hastings algorithm is actually the minimization (on the space of possible samplers) using an \(L^1\) norm. (Note that \(K(x,x)\) should be \(K(x,y)\) in equation (1.3), so it agrees with equation (2.1).)

The following article covers the Metropolis-Hastings algorithm in the context of machine learning (particularly Bayesian statistics):

  • 2003 – Andrieu, de Freitas, Doucet, and Jordan – An Introduction to MCMC for Machine Learning.

For a surprising real world application, in the following article, Diaconis briefly recounts a story about a couple of graduate students using the Metropolis-Hastings algorithm to decipher a letter from a prison inmate who had used a simple substitution cipher:

  • 2009 – Diaconis – The Markov chain Monte Carlo revolution.

For Markov chains on general state spaces, the following paper gives a survey of results (often with new proofs):

  • 2004 – Roberts and Rosenthal – General state space Markov chains and MCMC algorithms.
History

The history of this algorithm and related methods are described in the following articles:

  • 2003 – David – A History of the Metropolis Hastings Algorithm;
  • 2005 – Gubematis – Marshall Rosenbluth and the Metropolis algorithm;
  • 2011 – Robert and Casella – A Short History of Markov Chain Monte Carlo: Subjective Recollections from Incomplete Data.

Incidentally, the first author of the third paper, Christian P. Robert, posts regularly on Markov chain Monte Carlo methods, such as the Metropolis-Hastings algorithm, as well as many other topics.

Books

Modern books on stochastic simulations and Monte Carlo methods will often detail this method. For example, see the Handbook of Monte Carlo Methods (Section 6.1) by Kroese, Taimre and Botev. The book Stochastic Simulation: Algorithms and Analysis by Asmussen and Glynn also covers the method in Chapter XIII, Section 3. (For my remark on reversibility, see Remark 3.2 in Asmussen and Glynn.) There is also the book Monte Carlo Strategies in Scientific Computing by Liu; see Chapter 5.

Websites

There are many, many websites covering this topic. Searching around, the following link is probably my favourite, as it gives a detailed explanation on how the Metropolis-Hastings algorithm works and includes with Python code:

This post also covers it with Python code:

This site details the algorithm with R code:

Here’s a quick introduction with a one-dimensional example implemented in R:

Spiking neural networks

To say that artificial neural networks are having their day in the sun is an understatement. Commonly called just neural networks, you can’t glance at a news source without seeing some reference to artificial intelligence (AI), a term that has become synonymous with the statistical models known as artificial neural networks.

(I hasten to add that neural networks and artificial intelligence are distinct things.  Originally, the latter was a target, in the same way that 5G is a target for telecommunications, which you can reach using whichever means that allow you. Someone may say they are using artificial intelligence, but the models in use may be other statistical or machine learning models, of which there are plenty. At any rate, it now seems artificial neural networks are ahead of the pack.)

From performing language and image tasks to generating and composing artistic (or stochastic?) works, neural networks are impressive in what they can do.

But can these statistical models be better? And so they really work like the brain?

Brain-lite neural networks

Artificial neural networks, dreamt up in the 1940s and 1950s, were inspired by how brains work. But they only grew inspiration from the firing of neurons in brains. These statistical models behave differently to the grey matter that forms our brains. And we can see that by how differently they perform in terms of learning speed and energy usage.

Artificial neural networks require a lot of material to learn anything. The amount of data that is needed to teach or train a state-of-the artificial neural network to learn, say, basic natural language skills is equivalent to a human spending thousands of years being exposed to language. Clearly we are the faster learners.

These statistical models also consume vast amounts of energy for training and running. Our brains just fire along, doing incredibly impressive and diverse things day after day, while using energy at a rate too low to boil a cup of water.

So the question arises: Why don’t we make artificial neural networks more like our brains? Well, historically, the short answer is that these statistical models are nice.

What’s nice about artificial neural networks?

Typically artificial neural networks are specifically built to have two convenient properties. Linearity and continuity.

Linearity

Mathematically, linearity is great because it means you can pull things apart, do stuff, and then put it together without losing or gaining anything. In short, things add up. Matrices are linear operators, and neural networks are essentially just a series of very large matrices coupled together.

Continuity

Continuity is also a wonderfully tractable property. It means that if you adjust  something slightly, then the degree of change will be limited, well, continuous. There will be no jumps or gaps. Things will run smoothly. That means you can find gradients (or derivatives) of these models by performing, say, backpropagation. And that in turn allows the use of optimization functions, which often use gradients to take educated gaps in which way to walk to find maximum or minimum points of continuous functions.

How neurons fire

In the brains, neurons do fire not continuously, but in so-called spikes. In other words, the electrical currents coursing through brain neurons are not steady flow, but consist of series of current spikes. So we see that any continuity assumption in any model of the brain does not reflect reality.

The electrical workings of neurons have motivated researchers to propose  mathematical models for describing the flow of currents in the brain. One historically significant model is the Hodgkin-Huxeley model, whose proposal led to its developers to share the Nobel Prize in Medicine. This model gives us a not-so-nice nonlinear set of differential equations, which you may encounter in a course on solving such differential equations numerically.

The Hodgkin-Huxeley model is a complex model, perhaps needlessly complex in certain cases. Consequently, recalling the law of parsimony in statistics (which artificial neural networks routinely laugh at), researchers, often use other simpler models, such as the leaky integrate-and-fire model.

Brain-heavy neural networks

A relatively small number of researchers are working away at creating neural networks that more closely resemble brains. Much of these models hinge upon using spikes, giving rise to statistical models called spiking neural networks.

These neural networks are, strictly speaking, still artificial, being closely related to recurrent neural networks, a popular type of artificial neural network. But the aim is that these statistical models more closely resemble how brains do their magic.

Where are they?

The big problem of spiking neural networks is training (or fitting) them. The inherent lack of continuity in these networks means you can’t use your favourite gradient-based methods.  Unlike regular network models, that means you can’t do the forward pass, collecting key values along the way, and then do the backward pass, yielding the gradients.

In lieu of this, researchers have proposed other methods, such as approximating the discontinuous functions in spiking neural networks with continuous ones, but then you can find the gradients of these functions, giving you surrogate derivatives, and use them to train the model.

It sounds not quite legit. Using one function to infer something about another function. But some papers seems to suggest there is promise in this approach.

Still, spiking neural networks are a long way from the fame that their continuous cousins enjoy.

Software and hardware

So far I have only covered the model or theory aspects of this statistical model seeking to replicate the brain’s performance. You can liken that to just talking about the software. That’s my leaning, but idea of creating more brainy neural networks has led to hardware too.

Some companies, such as Intel, are now designing and manufacturing computer processors or chips that seek to mimic how the brain works. But the challenge remains in reconciling software and hardware. That’s because proposed software methods may not be suitable for hardware being designed and made.

Further reading

There are some survey papers on this topic, including:

Update: Here’s a more recent survey paper:

Creating a simple feedforward neural network (without using libraries)

Deep learning refers several classes of statistical models, most often neural networks, which are deep in the sense that they have many layers between the input and output. We can think of these layers as computational stages.

(More precisely, you can think of them as very big matrices.)

These statistical models have now become interchangeable with the much loved term artificial intelligence (AI). But how do neural networks work?

Neural networks are collections of large — often extraordinarily large — matrices with values that have been carefully chosen (or found) so that running inputs through these matrices generates accurate outputs for certain problems like classifying photos or writing readable sentences. There are many types of neural networks, but to understand them, it’s best to start with a basic one, which is an approach I covered in a previous post.

Without using any of the neural network libraries in MATLAB or Python (of which there are several), I wrote a simple four-layer feedforward (neural) network, which is also called a multilayer perceptron. This is an unadorned neural network without any of the fancy bells and whistles that they now possess.

And that’s all you need to understand the general gist of deep learning.

Binary classification problem

I applied the simple neural network to the classic problem of binary classification. More specifically, I created a simple problem by divided two-dimensional (Cartesian) square into two non-overlapping regions. My neural network needs to identify in region a point lies in a square. A simple problem, but it is both fundamental and challenging.

I created three such problems with increasing difficulty. Here they are:

  1. Simple: Ten points of two types located in a square, where the classification border  between the two types is curve lined.
  2. Voronoi: A Voronoi tessellation is (deterministically) created with a small number of seeds (or Voronoi cells). A point can either be in a given Voronoi cell or not, hence there are two types of points.
  3. Rose: A simple diagram of a four-petal flower or rose is created using a polar coordinates. Located entirely inside a square, points can either be inside the rose or not, giving two types of points.

Components of the neural network model

Optimization method

I fitted or or trained my four-layer neural network model by using a simple stochastic gradient descent method. The field of optimization (or operations research) abounds with methods based on gradients (or derivatives), which usually fall under the category of convex optimziation.

In the code I wrote,  a random coordinate is chosen, and then the fitting (or optimization) method takes a step where the gradient is the largest, where the size of step is dictated by a fixed constant called a learning rate. This procedure is repeated for some pre-fixed number of steps. The random choosing of the coordinate is done with replacement.

This is basically the simplest training method you can use. In practice, you never use such simple methods, relying upon more complex gradient-based methods such as Adam.

Cost function

For training, the so-called cost function or loss function is a root-mean-square function,1Or \(L^2\) norm. which goes against the flow today, as most neural networks now employ cost functions based on the maximum likelihood and cross-entropy. There is a good reason why these are used instead of the root-mean-square. They work much better.

Activation function

For the activation function, the code uses the sigmoid function, but you can easily change it to use recitified linear unit (ReLU), which is what most neural networks use today. For decades, it commonly accepted to use the sigmoid function, partly because it’s smooth. But it seems only work well for small networks. The rectified linear unit reigns supreme now, as it is considerably better than the sigmoid function and others in large neural networks.

Code

I stress that this code is only for educational purposes. It’s designed to gain intuition into how (simple) neural networks do what they do.

If you have a problem that requires neural networks (or deep learning), then use one of the libraries such as PyTorch or TensorFlow. Do not use my code for such problems.

I generally found that the MATLAB code run much faster and smoother than the Python code. Python isn’t great for speed. (Serious libraries are not written in Python but C or, like much of the matrix libraries in Python, Fortran.)

Here’s my code.

MATLAB

% This code runs a simple feedforward neural network inspired.
%
% The neural network is a multi-layer perceptron designed for a simple
% binary classification. The classification is determining whether a
% two-dimensional (Cartesian) point is located inside some given region or
% not.
%
% For the simple binary examples used here, the code seems to work for
% sufficiently large number of optimization steps, typically in the 10s and
% 100s of thousands.
%
% This neural network only has 4 layers (so 2 hidden layers). The
% trainning procedure, meaning the forward and backward passes, are
% hard-coded. This means changing the number of layers requires additional
% information on the neural network architecture.
%
% It uses the sigmoid function; see the activate function.
%
% NOTE: This code is for illustration and educational purposes only. Use a
% industry-level library for real problems.
%
% Author: H. Paul Keeler, 2019.
% Website: hpaulkeeler.com
% Repository: github.com/hpaulkeeler/posts

clearvars; clc; close all;

choiceData=3; %choose 1, 2 or 3
numbSteps = 2e5; %number of steps for the (gradient) optimization method
rateLearn = 0.05; %hyperparameter
numbTest = 1000; %number of points for testing the fitted model
boolePlot=true;

rng(42); %set seed for reproducibility of results

%generating or retrieving the training data
switch choiceData
    case 1
        %%% simple example
        %recommended minimum number of optimization steps: numbSteps = 1e5
        x1 = 2*[0.1,0.3,0.1,0.6,0.4,0.6,0.5,0.9,0.4,0.7]-1;
        x2 = 2*[0.1,0.4,0.5,0.9,0.2,0.3,0.6,0.2,0.4,0.6]-1;
        numbTrainAll = 10; %number of training data
        %output (binary) data
        y = [ones(1,5) zeros(1,5); zeros(1,5) ones(1,5)];
    case 2
        %%% voronoi example
        %recommended minimum number of optimization steps: numbSteps = 1e5
        numbTrainAll = 1000; %number of training data
        x1 = 2*rand(1,numbTrainAll)-1;
        x2=2*rand(1,numbTrainAll)-1;
        booleInsideVoroni=checkVoronoiInside(x1,x2);
        % output (binary) data
        y=[booleInsideVoroni;~booleInsideVoroni];
    case 3
        %%% rose/flower example
        %recommended minimum number of optimization steps: numbSteps = 2e5
        numbTrainAll=1000; %number of training data
        x1=2*rand(1,numbTrainAll)-1;
        x2=2*rand(1,numbTrainAll)-1;
        booleInsideFlower=checkFlowerInside(x1,x2);
        %output (binary) data
        y=[booleInsideFlower;~booleInsideFlower];

end
x=[x1;x2];
booleTrain = logical(y);

%dimensions/widths of neural network
numbWidth1 = 2; %must be 2 for 2-D input data
numbWidth2 = 4;
numbWidth3 = 4;
numbWidth4 = 2; %must be 2 for binary output
numbWidthAll=[numbWidth1,numbWidth2,numbWidth3,numbWidth4];
numbLayer=length(numbWidthAll);

%initialize weights and biases
scaleModel = .5;
W2 = scaleModel * randn(numbWidth2,numbWidth1);
b2 = scaleModel * rand(numbWidth2,1);
W3 = scaleModel * randn(numbWidth3,numbWidth2);
b3 = scaleModel * rand(numbWidth3,1);
W4 = scaleModel * randn(numbWidth4,numbWidth3);
b4 = scaleModel * rand(numbWidth4,1);

%create arrays of matrices
%w matrices
arrayW{1}=W2;
arrayW{2}=W3;
arrayW{3}=W4;
%b vectors
array_b{1}=b2;
array_b{2}=b3;
array_b{3}=b4;
%activation matrices
arrayA=mat2cell(zeros(sum(numbWidthAll),1),numbWidthAll);
%delta (gradient) vectors
array_delta=mat2cell(zeros(sum(numbWidthAll(2:end)),1),numbWidthAll(2:end));

costHistory = zeros(numbSteps,1); %record the cost for each step
for i = 1:numbSteps
    %forward and back propagation
    indexTrain=randi(numbTrainAll);
    xTrain = x(:,indexTrain);

    %run forward pass
    A2 = activate(xTrain,W2,b2);
    A3 = activate(A2,W3,b3);
    A4 = activate(A3,W4,b4);

    %new (replaces above three lines)
    arrayA{1}=xTrain;
    for j=2:numbLayer
        arrayA{j}=activate(arrayA{j-1},arrayW{j-1},array_b{j-1});
    end

    %run backward pass (to calculate the gradient) using Hadamard products
    delta4 = A4.*(1-A4).*(A4-y(:,indexTrain));
    delta3 = A3.*(1-A3).*(transpose(W4)*delta4);
    delta2 = A2.*(1-A2).*(transpose(W3)*delta3);

    %new (replaces above three lines)
    A_temp=arrayA{numbLayer};
    array_delta{numbLayer-1}=A_temp.*(1-A_temp).*(A_temp-y(:,indexTrain));
    for j=numbLayer-1:-1:2
        A_temp=arrayA{j};
        delta_temp=array_delta{j};
        W_temp=arrayW{j};
        array_delta{j-1}= A_temp.*(1-A_temp).*(transpose(W_temp)*delta_temp);
    end

    %update using steepest descent
    %transpose of xTrains used for W matrices
    W2 = W2 - rateLearn*delta2*transpose(xTrain);
    W3 = W3 - rateLearn*delta3*transpose(A2);
    W4 = W4 - rateLearn*delta4*transpose(A3);
    b2 = b2 - rateLearn*delta2;
    b3 = b3 - rateLearn*delta3;
    b4 = b4 - rateLearn*delta4;

    %new (replaces above six lines)
    for j=1:numbLayer-1
        A_temp=arrayA{j};
        delta_temp=array_delta{j};
        arrayW{j}=arrayW{j} - rateLearn*delta_temp*transpose(A_temp);
        array_b{j}=array_b{j} - rateLearn*delta_temp;
    end

    %update cost
    costCurrent_i = getCost(x,y,arrayW,array_b,numbLayer);
    costHistory(i) = costCurrent_i;
end

%generating test data
xTest1 = 2*rand(1,numbTest)-1;
xTest2 = 2*rand(1,numbTest)-1;
xTest = [xTest1;xTest2];
booleTest = (false(2,numbTest));

%testing every point
for k=1:numbTest
    xTestSingle = xTest(:,k);
    %apply fitted model
    yTestSingle = feedForward(xTestSingle,arrayW,array_b,numbLayer);
    [~,indexTest] = max(yTestSingle);

    booleTest(1,k) = (indexTest==1);
    booleTest(2,k) = (indexTest==2);
end

if boolePlot

    %plot history of cost
    figure;
    semilogy(1:numbSteps,costHistory);
    xlabel('Number of optimization steps');
    ylabel('Value of cost function');
    title('History of the cost function')

    %plot training data
    figure;
    tiledlayout(1,2);
    nexttile;
    hold on;
    plot(x1(booleTrain(1,:)),x2(booleTrain(1,:)),'rs');
    plot(x1(booleTrain(2,:)),x2(booleTrain(2,:)),'b+');
    xlabel('x');
    ylabel('y');
    title('Training data');
    axis([-1,1,-1,1]);
    axis square;

    %plot test data

    nexttile;
    hold on;
    plot(xTest1(booleTest(1,:)),xTest2(booleTest(1,:)),'rd');
    plot(xTest1(booleTest(2,:)),xTest2(booleTest(2,:)),'bx');
    xlabel('x');
    ylabel('y');
    title('Testing data');
    axis([-1,1,-1,1]);
    axis square;

end

function costTotal = getCost(x,y,arrayW,array_b,numbLayer)
numbTrainAll = max(size(x));
%originally y, x1 and x2 were defined outside this function
costAll = zeros(numbTrainAll,1);

for i = 1:numbTrainAll
    %loop through every training point
    x_i = x(:,i);

    A_Last=feedForward(x_i,arrayW,array_b,numbLayer);
    %find difference between algorithm output and training data
    costAll(i) = norm(y(:,i) - A_Last,2);
end
costTotal = norm(costAll,2)^2;
end

function y = activate(x,W,b)
z=(W*x+b);
%evaluate sigmoid (ie logistic) function
y = 1./(1+exp(-z));

%evaluate ReLU (rectified linear unit)
%y = max(0,z);
end

function A_Last= feedForward(xSingle,arrayW,array_b,numbLayer)
%run forward pass
A_now=xSingle;
for j=2:numbLayer
    A_next=activate(A_now,arrayW{j-1},array_b{j-1});
    A_now=A_next;
end


A_Last=A_next;
end

function booleFlowerInside=checkFlowerInside(x1,x2)
% This function creates a simple binary classification problem.
% A single point (x1,x2) is either inside a flower petal or not, where the
% flower (or rose) is defined in polar coordinates by the equation:
%
% rho(theta) =cos(k*theta)), where k is a positive integer.

orderFlower = 2;
[thetaFlower, rhoFlower] = cart2pol(x1(:)',x2(:)');
% check if point (x1,x2) is inside the rose
booleFlowerInside = abs(cos(orderFlower*thetaFlower)) <= rhoFlower;

end

function booleVoronoiInside=checkVoronoiInside(x1,x2)
% This function creates a simple binary classification problem.
% A single point (x1,x2) is either inside a chosen Voronoi cell or not,
% where the Voronoi cells are defined deterministically below.

numbPoints = length(x1);
% generat some deterministic seeds for the Voronoi cells
numbSeed = 6;
indexCellChosen = 4; %arbitrary chosen cells from first up to this number

t = 1:numbSeed;
% a deterministic points located on the square [-1,+1]x[-1,+1]
xSeed1 = sin(27*t.*pi.*cos(t.^2*pi+.4)+1.4);
xSeed2 = sin(4.7*t.*pi.*sin(t.^3*pi+.7)+.3);
xSeed = [xSeed1;xSeed2];

% find which Voroinoi cells each point (x1,x2) belongs to
indexVoronoi = zeros(1,numbPoints);
for i = 1:numbPoints
    x_i = [x1(i);x2(i)]; %retrieve single point
    diff_x = xSeed-x_i;
    distSquared_x = diff_x(1,:).^2+diff_x(2,:).^2; %relative distance squared
    [~,indexVoronoiTemp] = min(distSquared_x); %find closest seed
    indexVoronoi(i) = indexVoronoiTemp;
end

% see if points are inside the Voronoi cell number indexCellSingle
booleVoronoiInside = (indexVoronoi==indexCellChosen);
end

Python

The use of matrices in Python are kindly described as an afterthought. So it takes a bit of Python sleight of hand to get MATLAB code translated into working Python code.

(This stems partly from the fact that Python is row-major, as the language it’s built upon, C, whereas MATLAB is column-major, as its inspiration, Fortran.)

# This code runs a simple feedforward neural network.
#
# The neural network is a multi-layer perceptron designed for a simple
# binary classification. The classification is determining whether a
# two-dimensional (Cartesian) point is located inside some given region or
# not.
#
# For the simple binary examples used here, the code seems to work for
# sufficiently large number of optimization steps, typically in the 10s and
# 100s of thousands.
#
# This neural network only has 4 layers (so 2 hidden layers). The
# trainning procedure, meaning the forward and backward passes, are
# hard-coded. This means changing the number of layers requires additional
# information on the neural network architecture.
#
# It uses the sigmoid function; see the activate function.
#
# NOTE: This code is for illustration and educational purposes only. Use a
# industry-level library for real problems.
#
# For more details, see the post:
#
# https://hpaulkeeler.com/creating-a-simple-feedforward-neural-network-without-libraries/
#
# Author: H. Paul Keeler, 2019.
# Website: hpaulkeeler.com
# Repository: github.com/hpaulkeeler/posts

import numpy as np;  # NumPy package for arrays, random number generation, etc
import matplotlib.pyplot as plt  # For plotting
#from FunctionsExamples import checkFlowerInside, checkVoronoiInside

plt.close('all');  # close all figures

choiceData=1; #choose 1, 2 or 3

numbSteps = 1e5; #number of steps for the (gradient) optimization method
rateLearn = 0.05; #hyperparameter
numbTest = 1000; #number of points for testing the fitted model
boolePlot = True;

np.random.seed(42); #set seed for reproducibility of results

#helper functions for generating problems
def checkFlowerInside(x1,x2):
    # This function creates a simple binary classification problem.
    # A single point (x1,x2) is either inside a flower petal or not, where the
    # flower (or rose) is defined in polar coordinates by the equation:
    #
    # rho(theta) =cos(k*theta)), where k is a positive integer.

    orderFlower = 2;
    thetaFlower = np.arctan2(x2,x1);
    rhoFlower = np.sqrt(x1**2+x2**2);
    # check if point (x1,x2) is inside the rose
    booleFlowerInside = np.abs(np.cos(orderFlower*thetaFlower)) <= rhoFlower;
    return booleFlowerInside

def checkVoronoiInside(x1,x2):
    # This function creates a simple binary classification problem.
    # A single point (x1,x2) is either inside a chosen Voronoi cell or not,
    # where the Voronoi cells are defined deterministically below.
    numbPoints = len(x1);
    # generat some deterministic seeds for the Voronoi cells
    numbSeed = 6;
    indexCellChosen = 4; #arbitrary chosen cells from first up to this number

    t = np.arange(numbSeed)+1;
    # a deterministic points located on the square [-1,+1]x[-1,+1]
    xSeed1 = np.sin(27*t*np.pi*np.cos(t**2*np.pi+.4)+1.4);
    xSeed2 = np.sin(4.7*t*np.pi*np.sin(t**3*np.pi+.7)+.3);
    xSeed = np.stack((xSeed1,xSeed2),axis=0);

    # find which Voroinoi cells each point (x1,x2) belongs to
    indexVoronoi = np.zeros(numbPoints);
    for i in range(numbPoints):
        x_i = np.stack((x1[i],x2[i]),axis=0).reshape(-1, 1); #retrieve single point
        diff_x = xSeed-x_i;
        distSquared_x = diff_x[0,:]**2+diff_x[1,:]**2; #relative distance squared
        indexVoronoiTemp = np.argmin(distSquared_x); #find closest seed
        indexVoronoi[i] = indexVoronoiTemp;

    # see if points are inside the Voronoi cell number indexCellSingle
    booleVoronoiInside = (indexVoronoi==indexCellChosen);
    return booleVoronoiInside


#generating or retrieving the training data
if (choiceData==1):
    ### simple example
    #recommended minimum number of optimization steps: numbSteps = 1e5
    x1 = 2*np.array([0.1,0.3,0.1,0.6,0.4,0.6,0.5,0.9,0.4,0.7])-1;
    x2 = 2*np.array([0.1,0.4,0.5,0.9,0.2,0.3,0.6,0.2,0.4,0.6])-1;
    numbTrainAll = 10; #number of training data
    #output (binary) data
    y = np.array([[1,1,1,1,1,0,0,0,0,0],[0,0,0,0,0,1,1,1,1,1]]);

    x=np.stack((x1,x2),axis=0);

if (choiceData==2):
    ### voronoi example
    #recommended minimum number of optimization steps: numbSteps = 1e5
    numbTrainAll = 500; #number of training data
    x=2*np.random.uniform(0, 1,(2,numbTrainAll))-1;
    x1 = x[0,:];
    x2 = x[1,:];
    booleInsideVoroni=checkVoronoiInside(x1,x2);
    # output (binary) data
    y=np.stack((booleInsideVoroni,~booleInsideVoroni),axis=0);

if (choiceData==3):
    ### rose/flower example
    #recommended minimum number of optimization steps: numbSteps = 2e5
    numbTrainAll=100; #number of training data
    x=2*np.random.uniform(0, 1,(2,numbTrainAll))-1;
    x1 = x[0,:];
    x2 = x[1,:];
    booleInsideFlower=checkFlowerInside(x1,x2);
    #output (binary) data
    y=np.stack((booleInsideFlower,~booleInsideFlower),axis=0);

#helper functions for training and running the neural network
def activate(x,W,b):
    z=np.matmul(W,x)+b;
    #evaluate sigmoid (ie logistic) function
    y = 1/(1+np.exp(-z));

    #evaluate ReLU (rectified linear unit)
    #y = np.max(0,z);
    return y

def feedForward(xSingle,arrayW,array_b,numbLayer):
    #run forward pass
    A_now=xSingle;
    for j in np.arange(1,numbLayer):
        A_next=activate(A_now,arrayW[j-1],array_b[j-1]);
        A_now=A_next;
    A_Last=A_next;

    return A_Last;


def getCost(x,y,arrayW,array_b,numbLayer):
    numbTrainAll = np.max(x.shape);
    #originally y, x1 and x2 were defined outside this function
    costAll = np.zeros((numbTrainAll,1));

    for i in range(numbTrainAll):
        #loop through every training point
        x_i = x[:,i].reshape(-1, 1);

        A_Last=feedForward(x_i,arrayW,array_b,numbLayer);
        #find difference between algorithm output and training data
        costAll[i] = np.linalg.norm(y[:,i].reshape(-1, 1) - A_Last,2);

        costTotal = np.linalg.norm(costAll,2)**2;

    return costTotal

#dimensions/widths of neural network
numbWidth1 = 2; #must be 2 for 2-D input data
numbWidth2 = 4;
numbWidth3 = 4;
numbWidth4 = 2; #must be 2 for binary output
numbWidthAll=np.array([numbWidth1,numbWidth2,numbWidth3,numbWidth4]);
numbLayer=len(numbWidthAll);

#initialize weights and biases
scaleModel = .5;
W2 = scaleModel * np.random.normal(0, 1,(numbWidth2,numbWidth1));
b2 = scaleModel * np.random.uniform(0, 1,(numbWidth2,1));
W3 = scaleModel * np.random.normal(0, 1,(numbWidth3,numbWidth2));
b3 = scaleModel * np.random.uniform(0, 1,(numbWidth3,1));
W4 = scaleModel * np.random.normal(0, 1,(numbWidth4,numbWidth3));
b4 = scaleModel * np.random.uniform(0, 1,(numbWidth4,1));

#create lists of matrices
#w matrices
arrayW=[];
arrayW.append(W2);
arrayW.append(W3);
arrayW.append(W4);
#b vectors
array_b=[];
array_b.append(b2);
array_b.append(b3);
array_b.append(b4);
#activation matrices
arrayA=[];
for j in range(numbLayer):
    arrayA.append(np.zeros(numbWidthAll[j]).reshape(-1, 1).T);
#delta (gradient) vectors
array_delta=[];
for j in range(numbLayer-1):
    array_delta.append(np.zeros(numbWidthAll[j+1]).reshape(-1, 1).T);

numbSteps=int(numbSteps)
costHistory = np.zeros((numbSteps,1));
booleTrain = y;
for i in range(numbSteps):
    #forward and back propagation
    indexTrain=np.random.randint(numbTrainAll);
    xTrain = x[:,indexTrain].reshape(-1, 1);

    #run forward pass
    arrayA[0]=xTrain; #treat input as the A1 matrix
    for j in (range(numbLayer-1)):
        arrayA[j+1]=activate(arrayA[j],arrayW[j],array_b[j]);

    #run backward pass (to calculate the gradient) using Hadamard products
    A_temp=arrayA[-1];
    array_delta[-1]=A_temp*(1-A_temp)*(A_temp-y[:,indexTrain].reshape(-1, 1));
    for j in np.arange(numbLayer-2,0,-1):
        A_temp=arrayA[j];
        delta_temp=array_delta[j];
        W_temp=arrayW[j];
        array_delta[j-1]= A_temp*(1-A_temp)*np.matmul(np.transpose(W_temp),delta_temp);


    #update using steepest descent
    #transpose of xTrains used for W matrices
    for j in range(numbLayer-1):
        A_temp=arrayA[j];
        delta_temp=array_delta[j];
        arrayW[j]=arrayW[j] - rateLearn*np.matmul(delta_temp,np.transpose(A_temp));
        array_b[j]=array_b[j] - rateLearn*delta_temp;


    #update cost
    costCurrent_i = getCost(x,y,arrayW,array_b,numbLayer);
    costHistory[i] = costCurrent_i;

#generating test data
xTest = 2*np.random.uniform(0,1,(2,numbTest))-1;
xTest1 = xTest[0,:];
xTest2 = xTest[1,:];

booleTest = np.zeros((2,numbTest));

#testing every point
for k in range(numbTest):
    xTestSingle = xTest[:,k].reshape(-1, 1);
    #apply fitted model
    yTestSingle = feedForward(xTestSingle,arrayW,array_b,numbLayer);
    indexTest = np.argmax(yTestSingle, axis=0);
    booleTest[0,k] = ((indexTest==0)[0]);
    booleTest[1,k] = ((indexTest==1)[0]);

if boolePlot:
    #plot history of cost
    plt.figure();
    plt.semilogy(np.arange(numbSteps)+1,costHistory);
    plt.xlabel('Number of optimization steps');
    plt.ylabel('Value of cost function');
    plt.title('History of the cost function')

    #plot training data
    fig, ax = plt.subplots(1, 2);
    ax[0].plot(x1[np.where(booleTrain[0,:])],x2[np.where(booleTrain[0,:])],\
        'rs', markerfacecolor='none');
    ax[0].plot(x1[np.where(booleTrain[1,:])],x2[np.where(booleTrain[1,:])],\
        'b+');
    ax[0].set_xlabel('x');
    ax[0].set_ylabel('y');
    ax[0].set_title('Training data');
    ax[0].set_xlim([-1, 1])
    ax[0].set_ylim([-1, 1])
    ax[0].axis('equal');

    #plot test data
    ax[1].plot(xTest1[np.where(booleTest[0,:])],xTest2[np.where(booleTest[0,:])],\
        'rd', markerfacecolor='none');
    ax[1].plot(xTest1[np.where(booleTest[1,:])],xTest2[np.where(booleTest[1,:])],\
        'bx');
    ax[1].set_xlabel('x');
    ax[1].set_ylabel('y');
    ax[1].set_title('Testing data');
    ax[1].set_xlim([-1, 1])
    ax[1].set_ylim([-1, 1])
    ax[1].axis('equal');

Results

After fitting or training the models, I tested them by applying the fitted neural network to other data. (In machine learning and statistics, you famously don’t use the same data to train and test a model.)

The number of steps needed to obtain reasonable results was about 100 thousand. To get a feeling of this, look at the plot of the cost function value over the number of optimization steps. For more complicated problems, such as the flower or rose problem, even more steps were needed.

I found the Python code, which is basically a close literal translation (by me) of the MATLAB code, too slow, so I generated the results using MATLAB.

Note: These results were generated with stochastic methods (namely, the training method), so my results will not agree exactly with yours, but hopefully they’ll be close enough.

Simple

Voronoi

Rose

The rose problem was the most difficult to classify. Sometimes it was a complete fail. Sometimes the training method could only see one component of the rose. It worked a couple of times, namely with 20 thousand optimization steps and a random seed of 42.

I imagine this problem is difficult due to the obvious complex geometry. Specifically, the both ends of each petal become thin, which is where the testing breaks down.

Fail

Half-success

Success (mostly)

Further reading

There is just so many things to read on neural networks, particularly on the web. This post was inspired by this tutorial paper:

  • 2019 – Higham and Higham, Deep Learning: An Introduction for Applied Mathematicians.

I covered this paper in a previous post.

For a readable book, I recommend this book:

  • Goodfellow, Bengio, Courville – Deep Learning – MIT Press.


Testing the Julia language with point process simulations

I started writing these posts (or blog entries) about a year ago. In my first post I remarked how I wanted to learn to write stochastic simulations in a new language. Well, I found one. It’s called Julia. Here’s my code. And here are my thoughts.

Overview

For scientific programming, the Julia language has arisen as a new contender. Originally started in 2012, its founders and developers have (very) high aspirations, wanting the language to be powerful and accessible, while still having run speeds comparable to C. There’s been excitement about it, and even a Nobel Laureate in economics, Thomas Sargent, has endorsed it. He co-founded the QuantEcon project, whose website has this handy guide or cheat sheet for commands between MATLAB, Python and Julia.

That guide suggests that Julia’s main syntax inspiration comes from MATLAB. But perhaps its closest (and greatest) competitor in scientific programming languages is Python, which has become a standard language used in scientific programming, particularly in machine learning. Another competitor is the statistics language R, which is popular for data science. But R is not renown for its speed.

As an aside, machine learning is closely related to what many call data science. I consider the two disciplines as largely overlapping with statistics, where their respective emphases are on theory and practice. In these fields, often the languages Python and R are used. There are various websites discussing which language is better, such as this one, which in turn is based on this one. In general, it appears that computer scientists and statisticians respectively prefer using Python and R.

Returning to the Julia language, given its young age, the language is still very much evolving, but I managed to find suitable Julia functions for stochastic simulations. I thought I would try it out by simulating some point processes, which I have done several times before. I successfully ran all my code with Julia Version 1.0.3.

In short, I managed to replicate in (or even translate to) Julia the code that I presented in the following posts:

Simulating a homogeneous Poisson point process on a rectangle

Simulating a Poisson point process on a disk

Simulating a Poisson point process on a triangle

Simulating an inhomogeneous Poisson point process

Simulating a Matérn cluster point process

Simulating a Thomas cluster point process

The Julia code, like all the code I present here, can be found on my Github repository, which for this post is located here.

Basics

Language type and syntax

The Wikipedia article on Julia says:

Julia is a high-level general-purpose dynamic programming language designed for high-performance numerical analysis and computational science.

Scientific programming languages like the popular three MATLAB, R and Python, are interpreted languages. But the people behind Julia say:

it is a flexible dynamic language, appropriate for scientific and numerical computing, with performance comparable to traditional statically-typed languages.

Because Julia’s compiler is different from the interpreters used for languages like Python or R, you may find that Julia’s performance is unintuitive at first.

I already remarked that Julia’s syntax is clearly inspired by MATLAB, as one can see in this guide for MATLAB, Python and Julia. But there are key differences. For example, to access an array entry in Julia, you use square brackets (like in most programming languages), whereas parentheses are used in MATLAB or, that old mathematical programming classic, Fortran, which is not a coincidence.

Packages

Julia requires you to install certain packages or libraries, like most languages. For random simulations and plots, you have to install the respective Julia packages Distributions and Plots, which is done by running the code.

Pkg.add("Distributions");
Pkg.add("Plots");

After doing that, it’s best to restart Julia. These packages are loaded with the using command:

Using Distributions;
Using Plots;

Also, the first time it takes a while to run any code using those newly installed packages.

I should stress that there are different plotting libraries. But Plots, which contains many plotting libraries, is the only one I could get working. Another is PlotPy, which uses the Python library. As a beginner, it seems to me that the Julia community has not focused too much on developing new plotting functions, and has instead leveraged pre-existing libraries.

For standard scientific and statistical programming, you will usually also need the packages LinearAlgebra and Statistics.

Data types

Unlike MATLAB or R, Julia is a language that has different data types for numbers, such as integers and floating-point numbers (or floats). This puts Julia in agreement with the clear majority of languages, making it nothing new for most programmers. This is not a criticism of the language, but this can be troublesome if you’ve grown lazy after years of using MATLAB and R.

Simulating random variables

In MATLAB, R and Python, we just need to call a function for simulating uniform, Poisson, and other random variables. There’s usually a function for each type of random variable (or probability distribution).

Julia does simulation of random objects in a more, let’s say, object-oriented way (but I’m told, it’s not an object-oriented language). The probability distributions of random variables are objects, which are created and then sent to a general function for random generation. For example, here’s the code for simulating a Poisson variable with mean \(\mu=10\).

mu=10;
distPoisson=Poisson(mu);
numbPoisson=rand(distPoisson);

Similarly, here’s how to simulate a normal variable with mean \(\mu=10\) and standard deviation \(\sigma=1\).

mu=10;
sigma=1;
distNormal=Normal(mu,sigma);
numbNormal=rand(distNormal);

Of course the last two lines can be collapsed into one.

mu=10;
sigma=1;
numbNormal=rand(Normal(mu,sigma));

But if you just want to create standard uniform variables on the interval (0,1), then the code is like that in MATLAB. For example, this code creates a \(4\times3\) matrix (or array) \(X\) whose entries are simulation outcomes of independent uniform random variables:

X=rand(4,3);

The resulting matrix \(X\) is a Float 64 array.

Arrays

The indexing of arrays in Julia starts at one, just like MATLAB, R, or Fortran. When you apply a function to an array, you generally need to use the dot notation. For example, if I try to run the code:

Y=sqrt(rand(10,1)); #This line will result in an error.

then on my machine (with Julia Version 1.0.3) I get the error:

ERROR: DimensionMismatch(“matrix is not square: dimensions are (10, 1)”)

But this code works:

Y=sqrt.(rand(10,1));

Also, adding scalars to arrays can catch you in Julia, as you also often need to use the dot notation. This code:

Y=sqrt.(rand(10,1));
Z=Y+1; #This line will result in an error.

gives the error:

ERROR: MethodError: no method matching +(::Array{Float64,2}, ::Int64)

This is fixed by adding a dot:

Y=sqrt.(rand(10,1));
Z=Y.+1; #This line will work.

Note the dot has to be on the left hand side. I ended up just using dot notation every time to be safe.

Other traps exist. For example, with indexing, you need to convert floats to integers if you want to use them as indices.

Repeating array elements

There used to be a Julia function called repmat, like the one in MATLAB , but it was merged with a function called repeat. I used such repeating operations to avoid explicit for-loops, which is generally advised in languages like MATLAB and R. For example, I used the repelem function in MATLAB to simulate Matérn and Thomas cluster point processes. To do this in Julia, I had to use this nested construction:

y=vcat(fill.(x, n)...);

This line means that the first value in \(x \) is repeated \(n[1]\) times, where \(n[1]\) is the first entry of \(n\) (as indexing in Julia starts at one), then the second value of \(x\) is repeated \(n[2]\) times, and so on. For example, the vectors \(x=[7,4,9]\) and \(n=[2,1,3]\), the answer is \(y=[7,7,4,9,9,9]\).

To do this in Julia, the construction is not so bad, if you know how, but it’s not entirely obvious. In MATLAB I use this:

y=repelem(x,n);

Similarly in Python:

y=np.repeat(x,n);
Different versions of Julia

I found that certain code would work (or not work) and then later the same code would not work (or would work) on machines with different versions of Julia, demonstrating how the language is still being developed. More specifically, I ran code on Julia Version 1.0.3 (Date 2018-12-18) and Julia Version 0.6.4 (Date: 2018-07-09). (Note how there’s only a few months difference in the dates of the two versions.)

Consider the code with the errors (due to the lack of dot operator) in the previous section. The errors occurred on one machine with Julia Version 1.0.3, but the errors didn’t occur on another machine with the older Julia Version 0.6.4. For a specific example, the code:

Y=sqrt.(rand(10,1));
Z=Y+1; #This line will not result in an error on Version 0.6.4.

gives no error with Julia Version 0.6.4, while I have already discussed how it gives an error with Julia Version 1.0.3.

For another example, I copied from this MATLAB-Python-Julia guide the following command:

A = Diagonal([1,2,3]); #This line will (sometimes?) result in an error.

It runs on machine with Julia Version 0.6.4 with no problems. But running it on the machine with Julia Version 1.0.3 gives the error:

ERROR: UndefVarError: Diagonal not defined

That’s because I have not used the LinearAlgebra package. Fixing this, the following code:

using LinearAlgebra; #Package needed for Diagonal command.
A = Diagonal([1,2,3]); #This line should now work.

gives no error with Julia Version 1.0.3.

If you have the time and energy, you can search the internet and find online forums where the Julia developers have discussed why they have changed something, rendering certain code unworkable with the latest versions of Julia.

Optimization

It seems that performing optimization on functions is done with the Optim package.

Pkg.add("Optim");

But some functions need the Linesearches package, so it’s best to install that as well.

Pkg.add("Linesearches");

Despite those two optimization packages, I ended up using yet another package called BlackBoxOptim.

Pkg.add("BlackBoxOptim");

In this package, I used a function called bboptimize. This is the first optimziation function that I managed to get working. I do not know how it compares to the functions in the Optim and Linesearches packages.

In a previous post, I used optimization functions to simulate a inhomogeneous or nonhomogeneous Poisson point process on a rectangle. I’ve also written Julia code for this simulation, which is found below. I used bboptimize, but I had some problems when I initially set the search regions to integers, which the package did not like, as the values need to be floats. That’s why I multiple the rectangle dimensions by \(1.0\) in the following code:

boundSearch=[(1.0xMin,1.0xMax), (1.0yMin, 1.0yMax)]; #bounds for search box
#WARNING: Values of boundSearch cannot be integers!
resultsOpt=bboptimize(fun_Neg;SearchRange = boundSearch);
lambdaNegMin=best_fitness(resultsOpt); #retrieve minimum value found by bboptimize

Conclusion

In this brief experiment, I found the language Julia good for doing stochastic simulations, but too tricky for doing simple things like plotting. Also, depending on the version of Julia, sometimes my code would work and sometimes it wouldn’t. No doubt things will get better with time.

Further reading

As I said, Julia is still very much an ongoing project. Here’s a couple of links that helped me learn the basics.

https://en.wikibooks.org/wiki/Introducing_Julia/Arrays_and_tuples

https://voxeu.org/content/which-numerical-computing-language-best-julia-matlab-python-or-r

Julia, Matlab, and C

https://modelingguru.nasa.gov/docs/DOC-2676

Code

I’ve only posted here code for some of simulations, but the rest of the code is available on my GitHub repository located here. You can see how the code is comparable to that of MATLAB.

Poisson point process on a rectangle

I wrote about this point process here. The code is located here.

using Distributions #for random simulations
using Plots #for plotting

#Simulation window parameters
xMin=0;xMax=1;
yMin=0;yMax=1;
xDelta=xMax-xMin;yDelta=yMax-yMin; #rectangle dimensions
areaTotal=xDelta*yDelta;

#Point process parameters
lambda=100; #intensity (ie mean density) of the Poisson process

#Simulate Poisson point process
numbPoints=rand(Poisson(areaTotal*lambda)); #Poisson number of points
xx=xDelta*rand(numbPoints,1).+xMin;#x coordinates of Poisson points
yy=yDelta*(rand(numbPoints,1)).+yMin;#y coordinates of Poisson points

#Plotting
plot1=scatter(xx,yy,xlabel ="x",ylabel ="y", leg=false);
display(plot1);
Inhomogeneous Poisson point process on a rectangle

I wrote about this point process here. The code is located here.

using Distributions #for random simulations
using Plots #for plotting
using BlackBoxOptim #for blackbox optimizing

#Simulation window parameters
xMin=-1;xMax=1;
yMin=-1;yMax=1;
xDelta=xMax-xMin;yDelta=yMax-yMin; #rectangle dimensions
areaTotal=xDelta*yDelta;

s=0.5; #scale parameter

#Point process parameters
function fun_lambda(x,y)
    100*exp.(-(x.^2+y.^2)/s^2); #intensity function
end

###START -- find maximum lambda -- START ###
#For an intensity function lambda, given by function fun_lambda,
#finds the maximum of lambda in a rectangular region given by
#[xMin,xMax,yMin,yMax].
#NOTE: Need xMin, xMax, yMin, yMax to be floats eg xMax=1. See boundSearch

function fun_Neg(x)
     -fun_lambda(x[1],x[2]); #negative of lambda
end
xy0=[(xMin+xMax)/2.0,(yMin+yMax)/2.0];#initial value(ie centre)

#Find largest lambda value
boundSearch=[(1.0xMin,1.0xMax), (1.0yMin, 1.0yMax)];
#WARNING: Values of boundSearch cannot be integers!
resultsOpt=bboptimize(fun_Neg;SearchRange = boundSearch);
lambdaNegMin=best_fitness(resultsOpt); #retrieve minimum value found by bboptimize
lambdaMax=-lambdaNegMin;
###END -- find maximum lambda -- END ###

#define thinning probability function
function fun_p(x,y)
    fun_lambda(x,y)/lambdaMax;
end

#Simulate a Poisson point process
numbPoints=rand(Poisson(areaTotal*lambdaMax)); #Poisson number of points
xx=xDelta*rand(numbPoints,1).+xMin;#x coordinates of Poisson points
yy=yDelta*(rand(numbPoints,1)).+yMin;#y coordinates of Poisson points

#calculate spatially-dependent thinning probabilities
p=fun_p(xx,yy);
#Generate Bernoulli variables (ie coin flips) for thinning
booleRetained=rand(numbPoints,1).<p; #points to be retained
xxRetained=xx[booleRetained]; yyRetained=yy[booleRetained];

#Plotting
plot1=scatter(xxRetained,yyRetained,xlabel ="x",ylabel ="y", leg=false);
display(plot1);
Thomas point process on a rectangle

I wrote about this point process here. The code is located here.

using Distributions #for random simulations
using Plots #for plotting

#Simulation window parameters
xMin=-.5;
xMax=.5;
yMin=-.5;
yMax=.5;

#Parameters for the parent and daughter point processes
lambdaParent=10;#density of parent Poisson point process
lambdaDaughter=10;#mean number of points in each cluster
sigma=0.05; #sigma for normal variables (ie random locations) of daughters

#Extended simulation windows parameters
rExt=7*sigma; #extension parameter
#for rExt, use factor of deviation sigma eg 6 or 7
xMinExt=xMin-rExt;
xMaxExt=xMax+rExt;
yMinExt=yMin-rExt;
yMaxExt=yMax+rExt;
#rectangle dimensions
xDeltaExt=xMaxExt-xMinExt;
yDeltaExt=yMaxExt-yMinExt;
areaTotalExt=xDeltaExt*yDeltaExt; #area of extended rectangle

#Simulate Poisson point process
numbPointsParent=rand(Poisson(areaTotalExt*lambdaParent)); #Poisson number of points

#x and y coordinates of Poisson points for the parent
xxParent=xMinExt.+xDeltaExt*rand(numbPointsParent,1);
yyParent=yMinExt.+yDeltaExt*rand(numbPointsParent,1);

#Simulate Poisson point process for the daughters (ie final poiint process)
numbPointsDaughter=rand(Poisson(lambdaDaughter),numbPointsParent);
numbPoints=sum(numbPointsDaughter); #total number of points

#Generate the (relative) locations in Cartesian coordinates by
#simulating independent normal variables
xx0=rand(Normal(0,sigma),numbPoints);
yy0=rand(Normal(0,sigma),numbPoints);

#replicate parent points (ie centres of disks/clusters)
xx=vcat(fill.(xxParent, numbPointsDaughter)...);
yy=vcat(fill.(yyParent, numbPointsDaughter)...);

#Shift centre of disk to (xx0,yy0)
xx=xx.+xx0;
yy=yy.+yy0;

#thin points if outside the simulation window
booleInside=((xx.>=xMin).&(xx.<=xMax).&(yy.>=yMin).&(yy.<=yMax));
#retain points inside simulation window
xx=xx[booleInside];
yy=yy[booleInside];

#Plotting
plot1=scatter(xx,yy,xlabel ="x",ylabel ="y", leg=false);
display(plot1);

Simulating an inhomogeneous Poisson point process

In previous posts I described how to simulate homogeneous Poisson point processes on a rectangle, disk and triangle. But here I will simulate an inhomogeneous or nonhomogeneous Poisson point process. (Both of these terms are used, where the latter is probably more popular, but I prefer the former.) For such a point process, the points are not uniformly located on the underlying mathematical space on which the Poisson process is defined. This means that certain regions will, on average, tend to have more (or less) points than other regions of the underlying space.

Basics

Any Poisson point process is defined with a non-negative measure called the intensity or mean measure. I make the standard assumption that the intensity measure \(\Lambda\) has a derivative \(\lambda(x,y)\). (I usually write a single \(x\) to denote a point on the plane, that is \(x\in \mathbb{R}^2\), but in this post I will write the \(x\) and \(y\) and coordinates separately.) The function \(\lambda(x,y)\) is often called the intensity function or just intensity, which I further assume is bounded, so \(\lambda(x,y)<\infty\) for all points in a simulation window \(W\). Finally, I assume that the simulation window \(W\) is a rectangle, but later I describe how to lift that assumption.

Number of points

To simulate a point process, the number of points and the point locations in the simulation window \(W\) are needed. For any Poisson point process, the number of points is a Poisson random variable with a parameter (that is, a mean) \(\Lambda(W)\), which under our previous assumptions is given by the integral

$$\Lambda(W)=\int_W \lambda(x,y)dxdy. $$

Assuming we can evaluate such an integral analytically or numerically, then the number of points is clearly not difficult to simulate.

Locations of points

The difficulty lies in randomly positioning the points. But a defining property of the Poisson point process is its independence, which allows us to treat each point completely independently. Positioning each point then comes down to suitably simulating two (or more) random variables for Poisson point processes in two (or higher) dimensions. Similarly, the standard methods used for simulating continuous random variables can be applied to simulating random point locations of a Poisson point process.

In theory, you can rescale the intensity function with the total measure of the simulation window, giving

$$f(x,y):=\frac{\lambda(x,y)}{\Lambda(W)}. $$

We can then interpret this rescaled intensity function \(f(x,y)\) as the joint probability density of two random variables \(X\) and \(Y\), because it integrates to one,

$$\int_W f(x,y)dxdy=1.$$

Clearly the method for simulating an inhomogeneous Poisson point process depends on the nature of the intensity function. For the inhomogeneous case, the random variables \(X\) and \(Y\) are, in general, not independent.

Transformation

To simulate an inhomogeneous Poisson point process, one method is to first simulate a homogeneous one, and then suitably transform the points according to deterministic function. For simple random variables, this transformation method is quick and easy to implement, if we can invert the probability distribution. For example, a uniform random variable \(U\) defined on the interval \((0,1)\) can be used to give an exponential random variable by applying the transformation \(h(u)= -(1/\lambda)\log(u)\), where \(\lambda>0\), meaning \(h(U)\) is an exponential random variable with parameter \(\lambda>0\) (or mean \(1/\lambda\)).

Similarly for Poisson point processes, the transformation approach is fairly straightforward in a one-dimensional setting, but generally doesn’t work easily in two (or higher) dimensions. The reason being that often we cannot simulate the random variables \(X\) and \(Y\) independently, which means, in practice, we need first to simulate one random variable, then the other.

It is a bit easier if we can re-write the rescaled intensity function or joint probability density \(f(x,y)\) as a product of single-variable functions \(f_X(x)\) and \(f_Y(y)\), meaning the random variables \(X\) and \(Y\) are independent. We can then simulate independently the random variables \(X\) and \(Y\), corresponding to the \(x\) and \(y\) coordinates of the points. But this would still require integrating and inverting the functions.

Markov chain Monte Carlo

A now standard way to simulate jointly distributed random variables is to use Markov chain Monte Carlo (MCMC), which we can also use to simulate the the \(X\) and \(Y\) random variables. Applying MCMC methods is simply applying random point process operations repeatedly to all the points. But this is a bit too tricky and involved. Instead I’ll use a general yet simpler method based on thinning.

Thinning

The thinning method is the arguably the simplest and most general way to simulate an inhomogeneous Poisson point process. If you’re unfamiliar with thinning, I recommend my previous post on thinning and the material I cite.

This simulation method is simply a type of acceptance-rejection method for simulating random variables. More specifically, it is the acceptance-rejection or rejection method, attributed to the great John von Neumann, for simulating a continuous random variable, say \(X\), with some known probability density \(f(x)\). The method accepts/retains or rejects/thins the outcome of each random variable/point depending on the outcome of a uniform random variable associated with each random variable/point.

The thinning or acceptance-rejection method is also appealing because it is an example of a perfect simulation method, which means the distribution of the simulated random variables or points will not be an approximation. This can be contrasted with typical MCMC methods, which, in theory, reach the desired distribution of the random variables in infinite time, which is clearly not possible in practice.

Simulating the homogeneous Poisson point process

First simulate a homogeneous Poisson point process with intensity value \(\lambda^*\), which is an upper bound of the intensity function \(\lambda(x,y)\). The simulation step is the easy part, but what value is \(\lambda^*\)?

I will use the maximum value that the intensity function \(\lambda(x,y)\) takes, which I denote by

$$ \lambda_{\max}:=\max_{(x,y)\in W}\lambda(x,y),$$

so I set \(\lambda^*=\lambda_{\max}\). Of course with \(\lambda^*\) being an upper bound, you can use any larger \(\lambda\)-value, so \(\lambda^*\geq \lambda_{\max}\), but that just means more points will need to be thinned.

Scientific programming languages have implemented algorithms that find or estimate minima of mathematical functions, meaning such an algorithm just needs to find the \((x,y)\) point that gives the minimum value of \(-\lambda(x,y)\), which corresponds to the maximum value of \(\lambda(x,y)\). What is very important is that the minimization procedure can handle constraints on the \(x\) and \(y\) values, which in our case of a rectangular simulation window \(W\) are sometimes called box constraints.

Thinning the Poisson point process

All we need to do now is to thin the homogeneous Poisson point process with the thinning probability function

$$1-p(x,y)=\frac{\lambda(x,y)}{\lambda^*}.$$

This will randomly remove the points so the remaining points will form a inhomogeneous Poisson point process with intensity function
$$ (1-p(x,y))\lambda^* =\lambda(x,y).$$
As a result, we can see that provided \(\lambda^*\geq \lambda_{\max}>0\), this procedure will give the right intensity function \(\lambda(x,y)\). I’ll skip the details on the point process still being Poisson after thinning, as I have already covered this in the thinning post.

Empirical check

You can run an empirical check by simulating the point process a large number (say \(10^3\) or \(10^4\)) of times, and collect statistics on the number of points. As the number of simulations increases, the average number of points should converge to the intensity measure \(\Lambda(W)\), which is given by (perhaps numerically) evaluating the integral

$$\Lambda(W)=\int_W \lambda(x,y)dxdy.$$

This is a test for the intensity measure, a type of first moment, which will work for the intensity measure of any point process. But for Poisson point processes, the variance of the number of points will also converge to intensity measure \(\Lambda(W)\), giving a second empirical test based on second moments.

An even more thorough test would be estimating an empirical distribution (that is, performing and normalizing a histogram) on the number of points. These checks will validate the number of points, but not the positioning of the points. In my next post I’ll cover how to perform these tests.

Results

The homogeneous Poisson point process with intensity function \(\lambda(x)=100\exp(-(x^2+y^2)/s^2)\), where \(s=0.5\). The results look similar to those in the thinning post, where the thinned points (that is, red circles) are generated from the same Poisson point process as the one that I have presented here.

MATLAB

Python

Method extensions

We can extend the thinning method for simulating inhomogeneous Poisson point processes a couple different ways.

Using an inhomogeneous Poisson point process

The thinning method does not need to be applied to a homogeneous Poisson point process with intensity \(\lambda^*\). In theory, we could have simulated a suitably inhomogeneous Poisson point process with intensity function \(\lambda^*(x,y)\), which has the condition

$$ \lambda^*(x,y)\geq \lambda(x,y), \quad \forall (x,y)\in W .$$

Then this Poisson point process is thinned. But then we would still need to simulate the underlying Poisson point process, which often would be as difficult to simulate.

Partitioning the simulation window

Perhaps the intensity of the Poisson point process only takes two values, \(\lambda_1\) and \(\lambda_2\), and the simulation window \(W\) can be nicely divided or partitioned into two disjoints sets \(B_1\) and \(B_2\) (that is, \(B_1\cap B_2=\emptyset\) and \(B_1\cup B_2=W\)), corresponding to the subregions of the two different intensity values. The Poisson independence property allows us to simulate two independent Poisson point processes on the two subregions.

This approach only works for a piecewise constant intensity function. But if if the intensity function \(\lambda(x)\) varies wildly, the simulation window can be partitioned into subregions \(B_1\dots,B_m\) for different ranges of the intensity function \(\lambda(x)\). This allows us to simulate independent homogeneous Poisson point processes with different densities \(\lambda^*_1\dots, \lambda^*_m\), where for each subregion \(B_i\) we set

$$ \lambda^*_i:=\max_{x\in B_i}\lambda(x,y).$$

The resulting Poisson point processes are then suitably thinned, resulting in a more efficient simulation method. (Although I imagine the gain would often be small.)

Non-rectangular simulation windows

If you want to simulate on non-rectangular regions, which is not a disk or triangle, then the easiest way is to simulate a Poisson point process on a rectangle \(R\) that completely covers the simulation window, so \(W \subset R\subset \mathbb{R}^2\), and then set the intensity function \(\lambda \) to zero for the region outside the simulation window \(W\), that is \(\lambda (x,y)=0\) when \((x,y)\in R\setminus W\).

Further reading

In Section 2.5.2 of Stochastic Geometry and its Applications by Chiu, Stoyan, Kendall and Mecke, there is an outline of the thinning method that I used. The same simulation section appears in the previous edition by Kendall and Mecke, though these books in general have little material on simulation methods.

More details on the thinning method and its connection to acceptance-rejection sampling are given in Section 2.3 of the applications-oriented book Poisson Point Processes by Streit. The acceptance-rejection method is covered in, for example, books on Monte Carlo methods, including Monte Carlo Strategies in Scientific Computing by Liu (in Section 2.2 )and Monte Carlo Methods in Financial Engineering by Glasserman (in Section 2.2.2). This method and others for simulating generals random variable are covered in stochastic simulation books such as Uniform Random Variate Generation by Devroye and Stochastic Simulation: Algorithms and Analysis by Asmussen and Glynn.

Kroese and Botev have a good introduction to stochastic simulation in the edited collection Stochastic Geometry, Spatial Statistics and Random Fields : Models and Algorithms by Schmidt, where the relevant chapter (number 12) is also freely available online. And of course there are lectures notes on the internet that cover simulation material.

Code

All code from my posts, as always, can be found on the my GitHub repository. The code for this post is located here. You can see that the code is very similar to that of the thinning code, which served as the foundation for this code. (Note how we now keep the points, so in the code the > has become < on the line where the uniform variables are generated).

I have implemented the code in MATLAB and Python with an intensity function \(\lambda(x,y)=100\exp(-(x^2+y^2)/s^2)\), where \(s>0\) is a scale parameter. Note that in the minimization step, the box constraints are expressed differently in MATLAB and Python: MATLAB first takes the minimum values then the maximum values, whereas Python first takes the \(x\)-values then the \(y\)-values.

The code presented here does not have the empirical check, which I described above, but it is implemented in the code located here. For the parameters used in the code, the total measure is \(\Lambda(W)\approx 77.8068\), meaning each simulation will generate on average almost seventy-eight points.

I have stopped writing code in R for a couple of reasons, but mostly because anything I could think of simulating in R can already be done in the spatial statistics library spatstat. I recommend the book Spatial Point Patterns, co-authored by the spatstat’s main contributor, Adrian Baddeley.

MATLAB

I have used the fmincon function to find the point that gives the minimum of \(-\lambda(x,y)\).

%Simulation window parameters
xMin=-1;xMax=1;
yMin=-1;yMax=1;
xDelta=xMax-xMin;yDelta=yMax-yMin; %rectangle dimensions
areaTotal=xDelta*yDelta; %area of rectangle

s=0.5; %scale parameter

%Point process parameters
fun_lambda=@(x,y)(100*exp(-((x).^2+(y).^2)/s^2));%intensity function

%%%START -- find maximum lambda -- START %%%
%For an intensity function lambda, given by function fun_lambda,
%finds the maximum of lambda in a rectangular region given by
%[xMin,xMax,yMin,yMax].
funNeg=@(x)(-fun_lambda(x(1),x(2))); %negative of lambda
%initial value(ie centre)
xy0=[(xMin+xMax)/2,(yMin+yMax)/2];%initial value(ie centre)
%Set up optimization step
options=optimoptions('fmincon','Display','off');
%Find largest lambda value
[~,lambdaNegMin]=fmincon(funNeg,xy0,[],[],[],[],...
[xMin,yMin],[xMax,yMax],'',options);
lambdaMax=-lambdaNegMin;
%%%END -- find maximum lambda -- END%%%

%define thinning probability function
fun_p=@(x,y)(fun_lambda(x,y)/lambdaMax);

%Simulate Poisson point process
numbPoints=poissrnd(areaTotal*lambdaMax);%Poisson number of points
xx=xDelta*(rand(numbPoints,1))+xMin;%x coordinates of Poisson points
yy=xDelta*(rand(numbPoints,1))+yMin;%y coordinates of Poisson points

%calculate spatially-dependent thinning probabilities
p=fun_p(xx,yy);

%Generate Bernoulli variables (ie coin flips) for thinning
booleRetained=rand(numbPoints,1)<p; %points to be thinned

%x/y locations of retained points
xxRetained=xx(booleRetained); yyRetained=yy(booleRetained);

%Plotting
plot(xxRetained,yyRetained,'bo'); %plot retained points
xlabel('x');ylabel('y');

The box constraints for the optimization step were expressed as:

[xMin,yMin],[xMax,yMax]
Python

I have used the minimize function in SciPy.

import numpy as np; #NumPy package for arrays, random number generation, etc
import matplotlib.pyplot as plt #For plotting
from scipy.optimize import minimize #For optimizing
from scipy import integrate

#Simulation window parameters
xMin=-1;xMax=1;
yMin=-1;yMax=1;
xDelta=xMax-xMin;yDelta=yMax-yMin; #rectangle dimensions
areaTotal=xDelta*yDelta;

s=0.5; #scale parameter

#Point process parameters
def fun_lambda(x,y):
return 100*np.exp(-(x**2+y**2)/s**2); #intensity function

###START -- find maximum lambda -- START ###
#For an intensity function lambda, given by function fun_lambda,
#finds the maximum of lambda in a rectangular region given by
#[xMin,xMax,yMin,yMax].
def fun_Neg(x):
return -fun_lambda(x[0],x[1]); #negative of lambda

xy0=[(xMin+xMax)/2,(yMin+yMax)/2];#initial value(ie centre)
#Find largest lambda value
resultsOpt=minimize(fun_Neg,xy0,bounds=((xMin, xMax), (yMin, yMax)));
lambdaNegMin=resultsOpt.fun; #retrieve minimum value found by minimize
lambdaMax=-lambdaNegMin;
###END -- find maximum lambda -- END ###

#define thinning probability function
def fun_p(x,y):
return fun_lambda(x,y)/lambdaMax;

#Simulate a Poisson point process
numbPoints = np.random.poisson(lambdaMax*areaTotal);#Poisson number of points
xx = np.random.uniform(0,xDelta,((numbPoints,1)))+xMin;#x coordinates of Poisson points
yy = np.random.uniform(0,yDelta,((numbPoints,1)))+yMin;#y coordinates of Poisson points

#calculate spatially-dependent thinning probabilities
p=fun_p(xx,yy);

#Generate Bernoulli variables (ie coin flips) for thinning
booleRetained=np.random.uniform(0,1,((numbPoints,1)))<p; #points to be thinned

#x/y locations of retained points
xxRetained=xx[booleRetained]; yyRetained=yy[booleRetained];

#Plotting
plt.scatter(xxRetained,yyRetained, edgecolor='b', facecolor='none', alpha=0.5 );
plt.xlabel("x"); plt.ylabel("y");
plt.show();

The box constraints were expressed as:

(xMin, xMax), (yMin, yMax)
Julia

After writing this post, I later wrote the code in Julia. The code is here and my thoughts about Julia are here.